Posted on Leave a comment

Halloween is a fantastic time for crafting with your Cricut machine. Here are some creative ideas to get you started

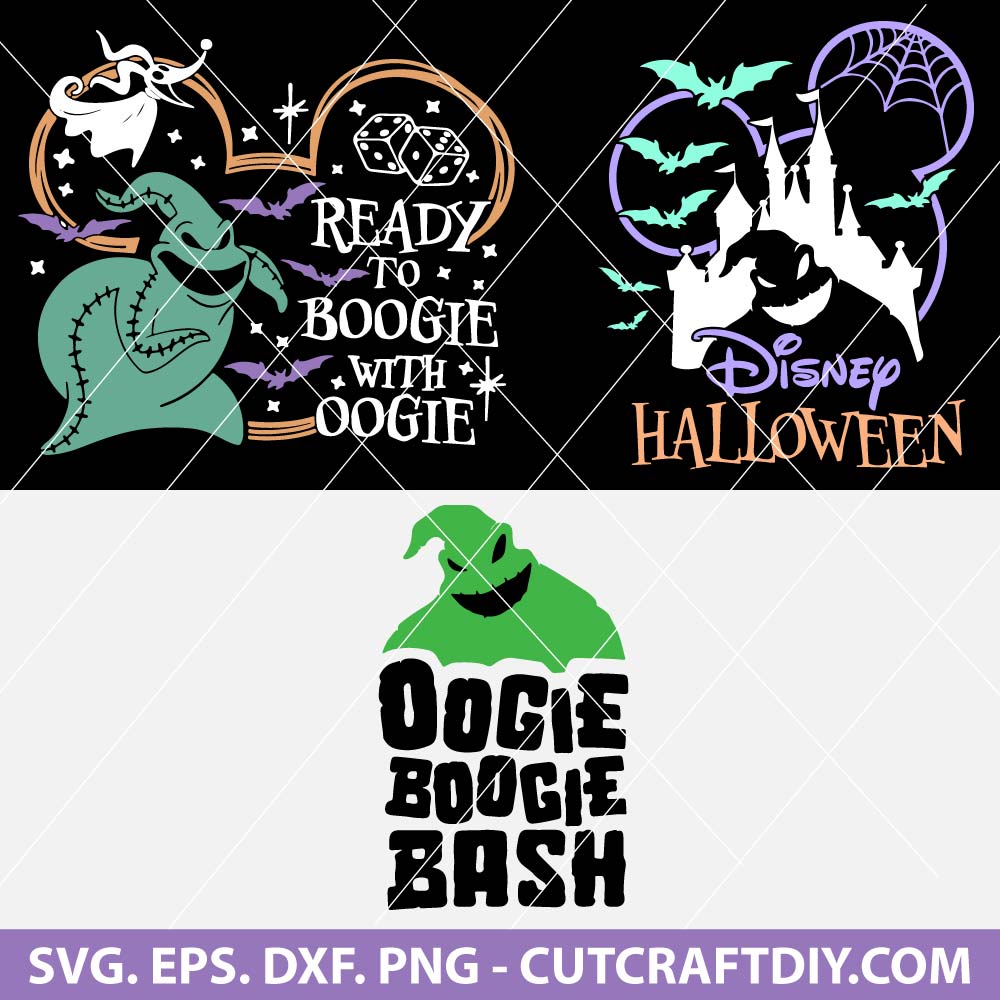
Oogie Boogie SVG Bundl

Spooky Decorations:

Create spooky vinyl decals to stick on windows, mirrors, or walls.
Design and cut out bats, ghosts, pumpkins, witches, and other Halloween-themed shapes to hang as garlands.
Make eerie lanterns by cutting intricate designs into paper and placing them around LED candles.
Costume Accessories:

Design and cut masks, crowns, hats, and other costume accessories from felt, foam, or fabric.
Personalize trick-or-treat bags with spooky graphics or names.
Craft unique jewelry like spider earrings, pumpkin pendants, or bat brooches.
Pumpkin Carving Templates:

Create vinyl stickers to use as stencils for pumpkin carving.
Cut out intricate designs or faces to stick directly onto pumpkins.
Home Textiles:

Design Halloween-themed tea towels, throw pillows, and blankets using heat transfer vinyl.
Cut out iron-on decals to embellish clothing or tote bags.
Party Decor:

Make custom invitations with spooky designs and intricate cutouts.
Craft cupcake toppers, cake toppers, and table decorations using cardstock or vinyl.
Design and cut out drink labels, place cards, and banners for a Halloween party.
Window Clings:

Create reusable window clings with Halloween motifs that can easily stick to glass surfaces.
Use static cling vinyl to design spooky scenes or silhouettes for your windows.
Trick-or-Treat Station:

Design and cut out signs for your front porch or yard to direct trick-or-treaters.
Create a fun sign to indicate your house is offering allergy-friendly treats.
Haunted House Dioramas:

Cut out haunted house silhouettes and other spooky elements to create intricate dioramas.
Candle Holders:

Decorate glass candle holders or votives with vinyl decals to create eerie ambiance.
Seasonal Cards:

Craft intricate Halloween cards with pop-up elements and layered designs.
Make spooky-themed cards to send to friends and family.
Remember to make use of various materials like vinyl, iron-on, cardstock, felt, and more, depending on your project. With your Cricut machine, the possibilities are nearly endless. Just let your creativity flow and enjoy the process of bringing your Halloween ideas to life!


Posted on Leave a comment

Here are some more fall-themed SVG project ideas for your Cricut machine

Fall Leaf Garland: Cut out a variety of colorful fall leaves and string them together to create a festive garland that you can hang across your mantel or along a wall.

Autumn Luminary Jars: Decorate glass jars with vinyl cutouts of leaves, pumpkins, or other fall shapes. Place tea lights or LED candles inside for a warm autumn glow.

Seasonal Coasters: Design and cut out intricate coasters featuring fall designs. Consider using materials like cork or faux leather for an authentic touch.

Harvest Banner: Craft a rustic banner with burlap or canvas triangles. Add vinyl letters to spell out “Harvest” or other fall-related words.

Fall Gift Tags: Create unique gift tags for autumn presents using cutouts of fall leaves, acorns, or small pumpkins.

Pie Box Decals: Design decals for pie boxes if you’re giving out baked goods during the fall season. Add a charming touch to your homemade pies.

Autumn Coloring Pages: Design intricate coloring pages with fall patterns and motifs that can be printed and colored in.

Seasonal Kitchen Towels: Personalize kitchen towels with fall-themed designs using iron-on vinyl. Think about phrases like “Give Thanks” or “Bless the Food.”

Fall Felt Ornaments: Cut out felt shapes like leaves, pumpkins, and squirrels to create adorable ornaments for your fall tree or home decor.

Wooden Pumpkin Patch: Cut out wooden pumpkin shapes and paint or decorate them with vinyl to create a mini pumpkin patch display.

Fall Floral Arrangements: Use your Cricut machine to cut out flower templates, leaves, and stems. Arrange them into a beautiful fall bouquet.

Apple Cider Labels: Design labels for bottles of apple cider or other fall beverages. Add a touch of elegance to your homemade drinks.

Autumn Bookmarks: Craft decorative bookmarks with fall designs and quotes, making them perfect for cozy reading sessions.

Fall Shadow Box: Create a shadow box scene with layers of cutout fall elements like leaves, scarecrows, and sunflowers.

Hayride Signs: Make signs for a pretend hayride or fall-themed play area, complete with arrow signs, distance markers, and fun graphics.

Remember, your Cricut machine is a versatile tool that allows you to experiment with various materials, designs, and project sizes. Whether you’re creating home decor, gifts, or just indulging in some seasonal crafting, there’s a wide array of fall-themed projects you can bring to life.


Posted on Leave a comment

Here are some more laser-cut Halloween earring ideas to spark your creativity

Black Cat Earrings:
Design sleek and stylish black cat silhouettes using laser-cutting on materials like acrylic or wood. Add intricate details to capture the cat’s elegance.

Witch Broom Earrings:
Create laser-cut broomstick designs that evoke the image of a witch’s flying broom. You can experiment with different broom shapes and sizes.

Vampire Bat Earrings:
Craft laser-cut vampire bat designs with detailed wings and fangs. These earrings can capture the spooky charm of vampire lore.

Halloween Lantern Earrings:
Design laser-cut lantern shapes with spooky scenes or patterns. Add tiny LED lights inside to make them glow eerily.

Zombie Hand Earrings:
Create intricate laser-cut zombie hand designs that dangle as earrings. These can capture the creepy and gory side of Halloween.

Mummy Earrings:
Design laser-cut mummy wraps that encase miniature mummy figures. The wrapping details can be finely etched for authenticity.

Moon Phase Earrings:
Craft laser-cut moon phase earrings that showcase different lunar stages. Combine them with other elements like bats or stars.

Witch’s Hat and Broomstick Combo:
Combine laser-cut witch hat and broomstick designs in a single earring piece. This creates a dynamic and playful accessory.

Halloween Bat Swarm Earrings:
Create a mesmerizing swarm of bats using laser-cutting. These can be layered to create a sense of depth and movement.

Creepy Crawly Earrings:
Design laser-cut earrings featuring a variety of creepy crawlies like spiders, centipedes, or scorpions. These can have a slightly unsettling yet captivating appeal.

Pumpkin Patch Earrings:
Craft a cluster of laser-cut pumpkins on a single earring, capturing the essence of a pumpkin patch in miniature form.

Ouija Board Earrings:
Create intricate laser-cut Ouija board designs that showcase the letters, numbers, and symbols of a classic spirit board.

Witch Cauldron Earrings:
Design laser-cut witch cauldron shapes filled with mysterious bubbling potions and swirling smoke.

Remember to consider the size, materials, and complexity of the designs to ensure that the earrings are comfortable to wear and visually appealing. Laser-cutting offers endless possibilities for detailed and captivating Halloween-themed earrings!

Posted on Leave a comment

Thanksgiving Day is a wonderful occasion for expressing gratitude and spending time with loved ones

Thankful Banner: Create a beautiful banner that spells out “Thankful” or “Gratitude.” Use fall-themed colors and patterns, and add individual leaves or pumpkins to each letter for an extra touch.

Place Cards: Design unique place cards for your Thanksgiving table using Cricut. Incorporate autumn motifs like leaves, acorns, or turkeys. You could even add your guests’ names in an elegant script font.

Table Runner: Personalize a plain table runner with a festive design. Consider a repeating pattern of pumpkins, leaves, and other autumn elements to set the perfect mood for your Thanksgiving feast.

Gratitude Jar: Create a stylish jar or box to collect gratitude notes from your guests. Cut out various leaf shapes or other fall-inspired designs and provide pens for guests to write down what they’re thankful for.

Napkin Rings: Craft custom napkin rings that feature Thanksgiving-themed elements, like mini pumpkins, turkeys, or cornucopias. These can be a lovely addition to your table setting.

Pie Boxes: If you’re sending your guests home with slices of pie, design and cut out decorative pie boxes. Add a “Thankful for You” message and autumn decorations to make the boxes extra special.

Candle Holders: Use your Cricut to decorate plain glass candle holders with fall leaves, acorns, or other Thanksgiving icons. When you light the candles, the designs will cast beautiful shadows.

Menu Cards: Design menu cards for your Thanksgiving meal. Include a list of the dishes you’re serving, along with a short description. This can be a great conversation starter at the table.

Wall Art: Create a piece of wall art with a Thanksgiving-themed quote or saying. Combine beautiful typography with autumn imagery to create a heartfelt and decorative piece.

Kids’ Craft Activities: Set up a craft station for the younger attendees. Provide pre-cut shapes of turkeys, pumpkins, and other fall items, and let the kids create their own Thanksgiving decorations.

Photo Booth Props: Design and cut out photo booth props for a fun Thanksgiving-themed photo session. Include things like pilgrim hats, turkey masks, and speech bubbles with phrases like “Gobble Gobble.”

Thanksgiving Apron: Personalize aprons for yourself and your family members with Thanksgiving-related designs. It’s a practical and festive accessory for cooking and baking.

Remember, the possibilities are endless with Cricut! You can customize and combine these ideas to create a unique and memorable Thanksgiving experience for you and your loved ones.

Posted on Leave a comment

He are some more pumpkin-themed Cricut ideas to inspire your creativity

Pumpkin Treat Bags: Cut out pumpkin shapes from cardstock or fabric and create adorable treat bags for Halloween or fall-themed parties.

Pumpkin Wall Art: Cut out a large pumpkin shape and create a unique piece of wall art by adding your own creative touches, such as painting, stenciling, or layering.

Pumpkin Mason Jar Lanterns: Cut pumpkin designs from adhesive vinyl and apply them to mason jars. Place LED tea lights inside the jars to create charming lanterns.

Pumpkin Coasters: Cut pumpkin shapes from cork or felt using your Cricut and create custom coasters for your fall beverages.

Pumpkin Tote Bags: Personalize tote bags with pumpkin designs using iron-on vinyl. These make great reusable bags for fall shopping.

Pumpkin Napkin Rings: Cut out pumpkin shapes from cardstock or felt and create napkin rings to add a festive touch to your fall table settings.

Pumpkin Party Invitations: Design unique pumpkin-themed party invitations by cutting pumpkin shapes and adding details like party information and embellishments.

Pumpkin Jewelry: Cut pumpkin shapes from lightweight wood or acrylic and turn them into earrings, necklaces, or pins.

Pumpkin Puzzle: Create a pumpkin-shaped puzzle by cutting a pumpkin design into several pieces of cardboard or wood using your Cricut.

Pumpkin Glass Etching: Cut pumpkin stencils from vinyl and use them to etch pumpkin designs onto glass surfaces like vases, jars, or glassware.

Pumpkin Bookmarks: Cut out pumpkin shapes from cardstock and add ribbon or tassel accents to create fall-themed bookmarks.

Pumpkin Photo Props: Design pumpkin-shaped photo props using your Cricut, perfect for fall-themed photo shoots or parties.

Pumpkin Place Mats: Cut pumpkin designs from fabric or vinyl and create festive place mats to enhance your dining table.

Pumpkin Keychains: Cut pumpkin shapes from leather or faux leather using your Cricut and turn them into cute keychains or bag charms.

Pumpkin Laptop Decals: Customize your laptop or tablet with pumpkin decals cut from adhesive vinyl.

Remember, your Cricut machine offers endless possibilities, so feel free to combine different ideas, materials, and techniques to create unique pumpkin-themed crafts that suit your style and preferences. Happy crafting!

Posted on Leave a comment

Creating a fall-themed SVG (Scalable Vector Graphics)

Design: Fall Leaves and Pumpkin Banner

Description:
Create a simple yet charming fall-themed banner featuring leaves and a pumpkin. This SVG design can be used for various DIY projects, such as creating banners, signs, greeting cards, or even iron-on transfers for clothing.

Steps:

Materials Needed:

Design software (e.g., Adobe Illustrator, Inkscape, Canva)
Fall-themed clipart or illustrations of leaves and a pumpkin (or you can draw them yourself)
Text tool for adding text (optional)
Your creativity!
Design the Elements:

Open your design software and create a new document.
Draw or import fall leaves in different shapes, sizes, and colors. Arrange them to form a border or scattered pattern.
Add a pumpkin illustration or graphic in the center or to one side of the design.
Add Text (Optional):

If you’d like to include text, add a banner at the top or bottom of the design.
Use a fall-themed font (such as a rustic script or a bold serif) and type out a relevant phrase like “Welcome Fall,” “Autumn Vibes,” or any other text you prefer.
Arrange and Adjust:

Arrange the elements until you’re satisfied with the overall composition.
Adjust colors, sizes, and placements as needed to create a balanced and visually appealing design.
Export as SVG:

Once you’re happy with the design, export it as an SVG file format. Make sure to choose SVG as the export format and ensure that it includes all the necessary elements.
Printing and Usage:

Print the SVG design onto cardstock, paper, or other materials suitable for your chosen DIY project.
Cut out the elements if necessary (e.g., if you’re making a banner or card).
Use the design as a template for cutting fabric or vinyl for iron-on transfers if you’re making clothing items.
Remember to personalize the design to your liking and get creative with colors and arrangements. This fall-themed SVG can serve as a versatile base for various DIY projects, allowing you to add your unique touch to each creation.

Posted on Leave a comment

Here are some additional DIY ideas using Halloween SVG files

Window Decals and Stickers: Create spooky window decals or stickers using adhesive vinyl and Halloween SVG designs. These can be easily applied and removed from windows, mirrors, or other smooth surfaces.

Halloween Party Invitations: Design unique Halloween party invitations by incorporating SVG elements into your digital or printed invitations. Set the tone for your spooky event right from the start.

Cupcake Toppers and Wrappers: Cut out Halloween SVG designs from cardstock or paper to create cupcake toppers or wrappers. These can add a fun and festive touch to your Halloween-themed treats.

Felt Ornaments: Use Halloween SVG files as templates to create felt ornaments. Cut out the designs from colored felt and add embellishments like buttons, beads, or embroidery to make charming decorations for your home.

Masks and Costumes: Transform plain masks or costumes into Halloween-themed creations by adding SVG designs. Whether it’s a mask design, a cape, or other costume elements, SVG files can enhance your look.

Wreaths: Design and assemble a Halloween-themed wreath by incorporating SVG elements, such as bats, ghosts, pumpkins, or spooky phrases. Hang it on your front door or indoors to welcome guests.

Nail Art Stencils: Create nail art stencils using Halloween SVG files. Cut out the designs on vinyl or stencil material to achieve unique and intricate nail designs.

Lunchbox Notes: Add a touch of Halloween fun to your kids’ lunches by including small notes or designs created from Halloween SVG files. These can bring a smile to their faces during the day.

Stenciled Fabric: Use Halloween SVG designs as stencils to add spooky patterns to fabric items such as pillowcases, tea towels, or cloth napkins.

Window Treatments: Design and cut Halloween SVG designs from frosted or translucent vinyl to create striking window treatments that add privacy and a touch of Halloween flair.

Papercrafts: Incorporate Halloween SVG files into various papercraft projects, such as 3D paper sculptures, pop-up cards, or paper lanterns.

Digital Scrapbooking: Use Halloween SVG designs as digital embellishments for your digital scrapbooking projects. They can add a festive touch to your digital layouts.

Halloween Puzzles: Create custom Halloween-themed jigsaw puzzles by printing SVG designs onto puzzle pieces and assembling them for a fun activity.

Plant Pot Decals: Add a touch of Halloween to your indoor plants by applying SVG decals to plant pots. Use adhesive vinyl to create designs that match the spooky season.

Outdoor Yard Signs: Design and create outdoor yard signs with Halloween SVG elements to set a spooky scene in your front yard or garden.

Remember, the possibilities are endless when it comes to using Halloween SVG files for

Posted on Leave a comment

Here are some Back-to-School SVG DIY ideas that you can create using SVG

Tote Bags:

Use school-themed SVG files to create iron-on transfers for tote bags. Add designs like books, pencils, or an apple for the teacher.
T-shirts and Hoodies:

Customize your own Back-to-School apparel with SVG designs. Add phrases like “Straight Outta Summer” or “Future Genius” along with fun graphics.
Pencil Cases:

Jazz up plain pencil cases with SVG designs that feature quirky quotes, school supplies, or your favorite subjects.
Notebook Covers:

Create vinyl stickers using school-themed SVGs to decorate your notebooks and make them uniquely yours.
Laptop Decals:

Personalize your laptop with school-themed SVG decals, such as a graduation cap, equations, or a globe.
Bulletin Board Decor:

Cut out SVG designs like speech bubbles, arrows, or study-related images to create a dynamic bulletin board display.
Locker Magnets:

Make custom magnets with SVG designs to add some personality to your school locker. Think of fun emojis, motivational quotes, or subject-related symbols.
Desk Nameplates:

Design and cut out SVG nameplates for your desk, featuring your name, a favorite quote, or a subject-specific motif.
Bookmarks:

Craft unique bookmarks using school-themed SVGs. Think of designs like owls, pencils, or bookmarks shaped like classic textbooks.
Pencil Holders:

Use SVG designs to create decals for plain pencil holders or jars, making them more appealing and organized.
Classroom Door Decor:

Create welcome signs for your classroom door using SVG designs that reflect your personality or your teaching style.
Flashcards and Learning Aids:

Make interactive flashcards or learning aids with SVG graphics that enhance your understanding of subjects like math, science, or languages.
School Event Flyers:

Design eye-catching event flyers or posters using Back-to-School SVGs to promote clubs, workshops, or fundraisers.
Graduation Party Decor:

Plan ahead and use SVG designs for graduation party decorations like banners, cupcake toppers, and photo booth props.
Remember, SVG files are versatile and can be used with various cutting machines or design software. Make sure to choose designs that resonate with your Back-to-School theme and allow your creativity to shine!

Posted on Leave a comment

How to use SVG Alphabets (fonts) in Cricut

how to use svg fonts

Did you buy the SVG font and want to know how to use it with your Cricut? Here we’re gonna find out how to upload and how to use SVG fonts with your Cricut cutter.

Let’s start!

SVG fonts or TTF fonts – where’s the difference?

When you’re buying the SVG Font you should know that SVG font is not quite a font – it’s more like the vector alphabet – the bundle of all letters, which means that you will not be able to type with it like with simple TTF fonts you cave on your computer or mobile device. SVG font, or SVG Alphabet it’s a file that contains vector objects (all alphabet letters) as if you would buy any other SVG object.

So how to use SVG Fonts with Cricut Design Space?

To use SVG fonts with your Cricut cutter, you should consider the font like any other SVG file, not like a computer font. So to make words in Cricut design space from the SVG font or alphabet you bought you should follow these usual steps:

  1. you need to download your SVG font,
  2. upload it to Cricut design space
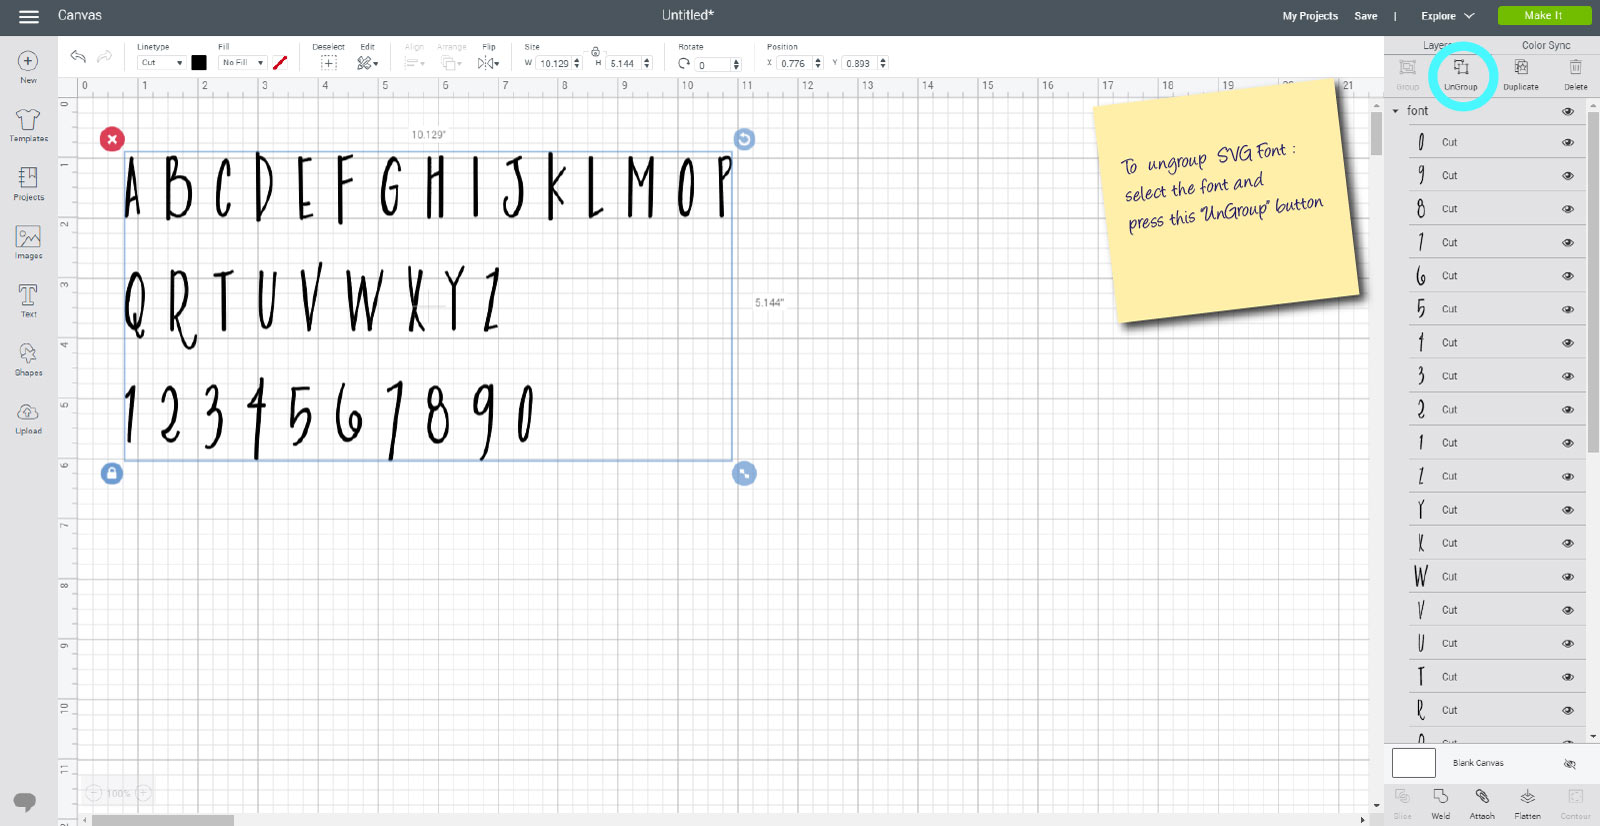
  3. you need to ungroup the alphabet
  4. now you can make words, move letters around and delete the ones you don’t need to use.
How to use SVG fonts with Cricut

Some tricks

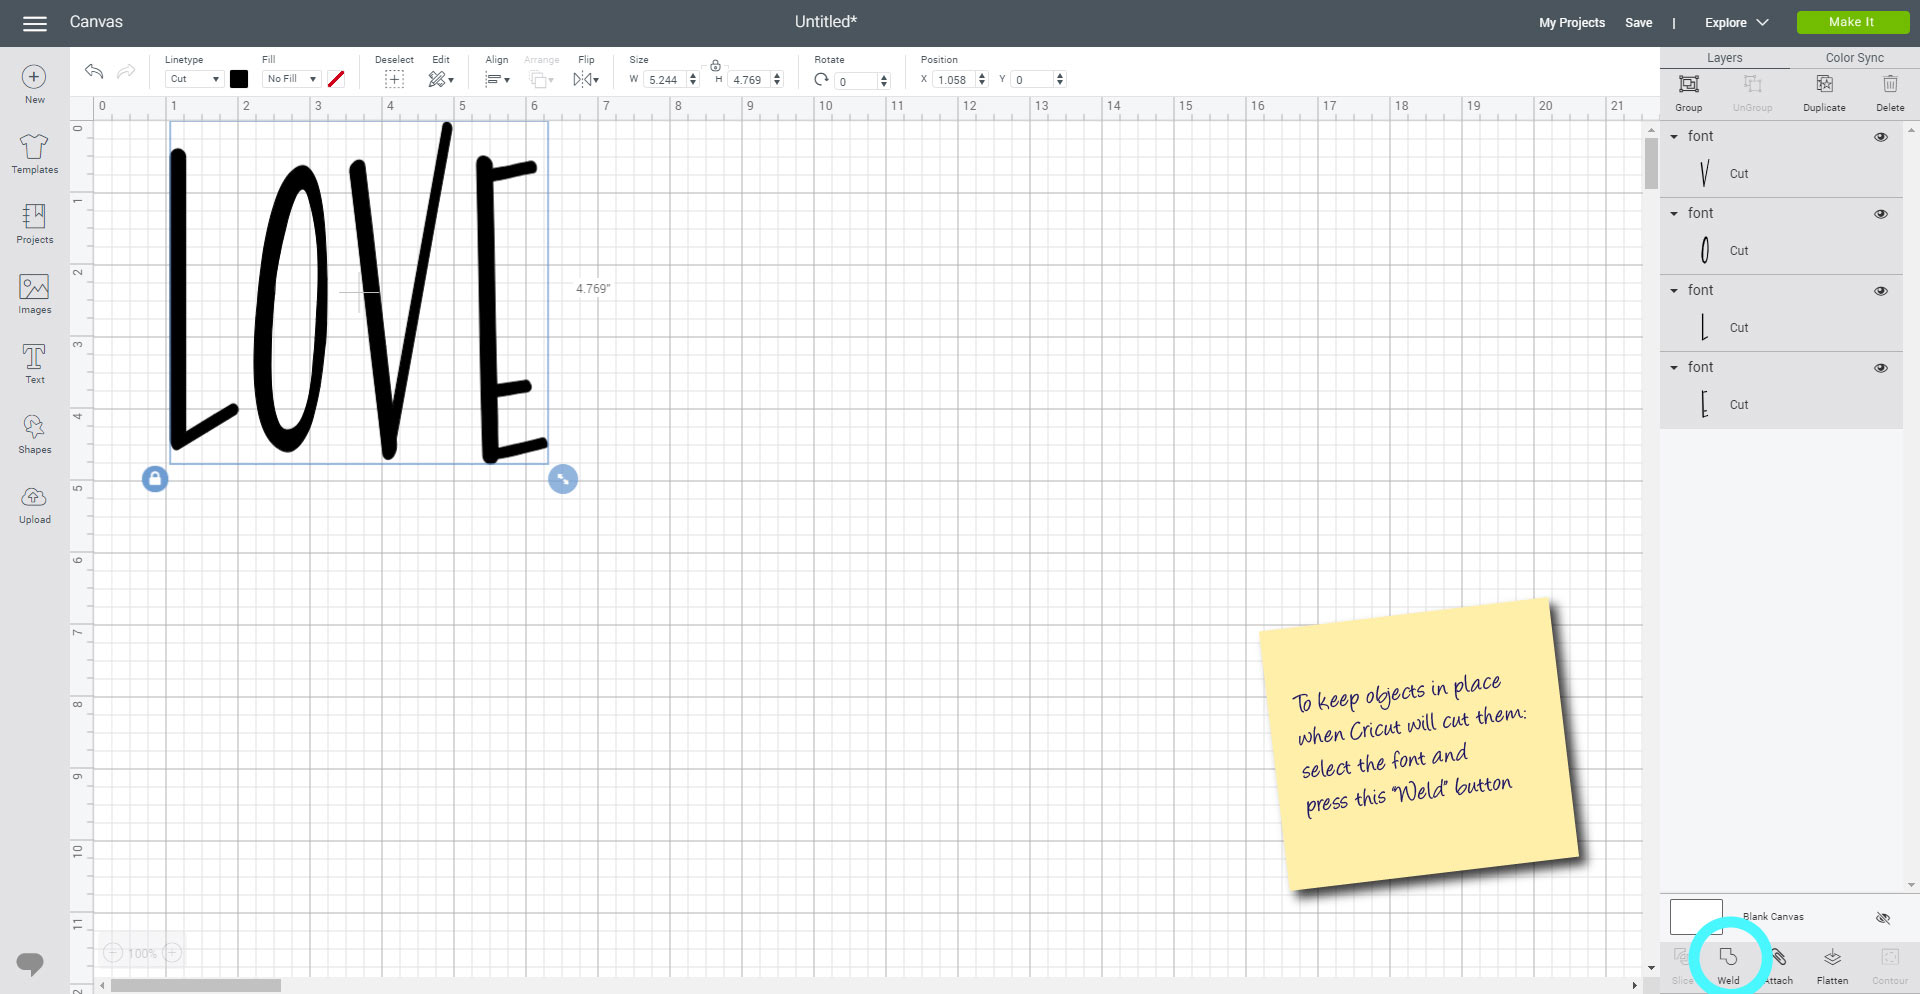
When you made a phrase from your SVG fonts in Cricut Design Space, it might be sentence, a word, or even just a couple letters you want to cut, you may want to keep them in place in cutting process, to make the rest part of work easier, and here is a small trick on how to do it. After you put the letters of your SVG Fonts in the right positions, you can press the “Weld” button in the right panel of Cricut Design space, to keep the elements stay in place even on cutting mat. Isn’t it cool? Now you won’t need to put the elements together in the right position after they’ll be cut.

How to use SVG fonts in Cricut

Hope it was helpful! Now you know how to use SVG fonts with your Cricut so let’s go and choose some SVG fonts here to try these tips?